Gallery Tutorial
Using DreamWeaver, CSS & jQuery
My tutorial covers a gallery using the basics of html, css and jvascript with two jquery plug-ins. Most sites need a gallery so I wanted to find one that looks somewhat fancy and is interactive. I ended up finding a great tutorial on www.lynda.com under the search of -- interactive photo gallery. I like this site because there is tons of learning material and they do a great job of walking you through the steps and explaining why we use what we do. This of course helps in learning other things as well not just the tutorial specifically. Prior to this I had no experience in javascript or plug-ins so I figured it was a good way to get familiar.
Another reason I chose to do this gallery is that I have a website I'm currently working on and I need the gallery for the next step. I am aware of simpilar programs which can also create nice galleries such as Adobe Bridge, Photo Shop, etc. But, i believe javascript will be more compatible friendly. I wanted to avoid the possiblilty of the user having to enable restrictions or deal with downlaoding a newer version of flash or something of that sort.
The gallery I chose is compatible with older browsers like windows XP back to ie 7. Also in ie 6, minus some transparencies. It works too for mobile devices, such as the android and Ipad. Though some older phones may not support javascript or some css, the html built in this gallery can be used to make seperate index files for that purpose. For example an index without js and an index without both js and css - allowing a user to still get a similar experience in an unsupportive browser by being able to see the images and get the fullsize view when clicking on the thumbnails.
You can check out javascript styles at www.jquery.com
Then go to Downloads -
For this we used jquery 1.5.2.min.js
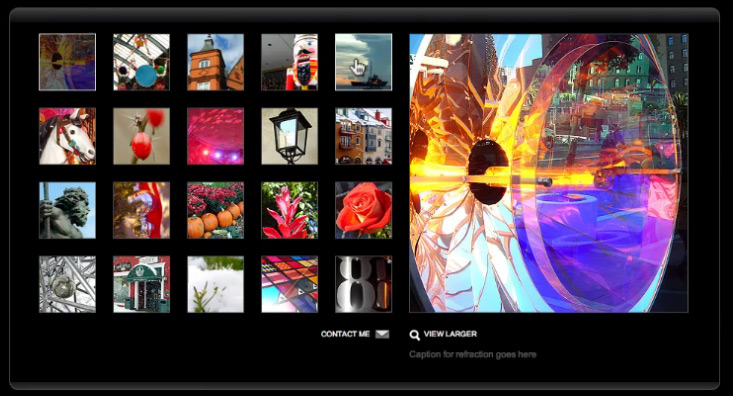
When the user scrolls over an image it becomes highlighted -- If a thumbnail image gets clicked on the transparency becomes darker and that image appears in the preview box on the right.
The full size image appears when we click on the picture in the preview window, the view larger icon or the caption -- It appears in the center with a caption and alightbox.
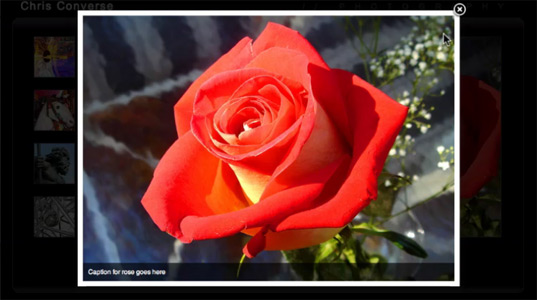
This is an example of a full-size preview with a light box
Here is where we will get into the tutorial
Good Luck!
Tutorial
Set Up: ( Section 1 )
1. It is a good idea to start by setting up your basic folder structure. Create your index page within this.
For your index -- in DW - File --> New --> HTML --> Doc Type: XHTML 1.0 Transitional --> Create. ///// Save the page -- File --> Save As - index - (this will be in the myGallery Folder)
This is what the structure will consist of:

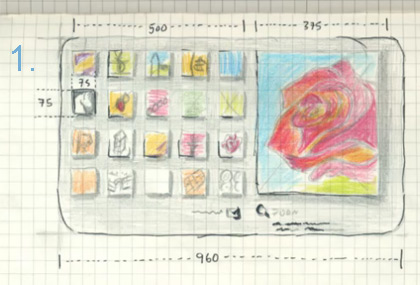
2. Then you will want to get an idea of your photo sizes and sketch out a map for spacing in your gallery. Your thumbnails will be on the left and your preveiw size on the right.
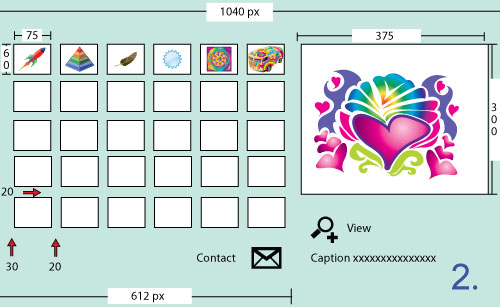
( 1. ) Their Example ( 2. ) My Example - Note: For each thumbnail you must add two pixels to the height and width for the boder which will be 1px around.
3. After you get that together you will be ready to crop your pics - Three of each will be needed: thumbnail size, preview size and full size. PhotoShop is a good program for this.
>>I will be demonstrating with my measurements throughout<<
My measurements were: _thumbnail - 75 x 60 --- _prevew - 375 x 60 --- _fullsize - 600 x 450.
Label each image size with the same _ ending per size. Also save each image as.. save for web and devices - high quality - 75 -- jpg
Example:
| heart_thumbnail.jpg | sky_thumbnail.jpg |
| heart_preview.jpg | sky_preview.jpg |
| heart_fullsize.jpg | sky_fullsize.jpg |
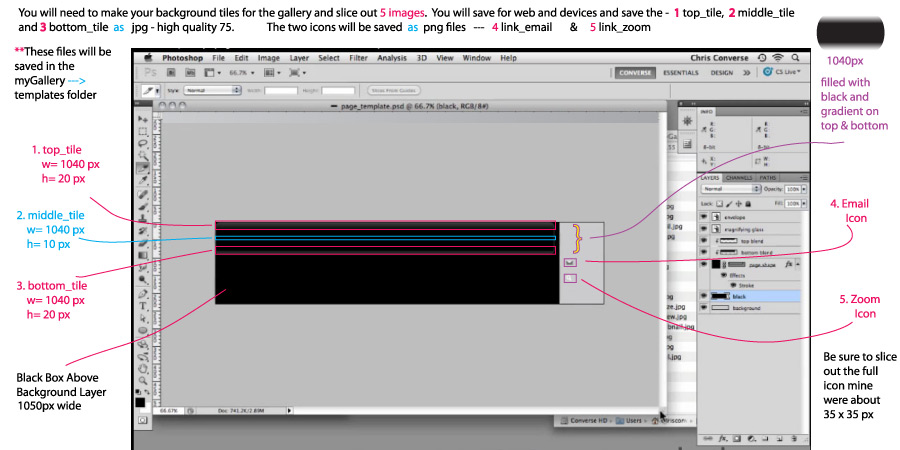
4. Now we will set up the background of the container
This will be your top, middle, and bottom tile // the email and zoom icons
After each you can double click inside it to put in your measurements. When you are done slicing turn off the background before saving.
HTML and CSS Setup: ( Section 2 )
Now we are going to set up the basics for the html code and css rules.
Link to html and css set up
Now that the html and css are set up from above we can 1. set up some new css rules for the headings and 2. Insert our thumbnails and set properties for them.
Properties for Headings
Inside div galeery_credit /// put in the name of the credit
Inside div gallery_type /// put in the type of the gallery
New CSS Rule -- tag -- h1 -- gallery.css
Box properties -- Padding; all = 0 // margin; all = 0 // Block properties -- Letter Spacing = 2 px // Type properties -- Font Size = 1.75 emNew CSS Rule -- tag -- h2 -- gallery.css ( note: in my gallery.css my h2 tag is labeled as an hh tag )
Box properties -- Padding; all = 0 // margin; all = 0 // Block properties -- Letter Spacing = 23 px // Type properties -- Font Size = 1.25 em -- Font weight = normal -- Font transform = uppercase -- Font color = #999Highlight the Credit and give it the h1 tag -- Then highlight the type and give it the h2 tag.
Adding Thumbnails
Now we will go through and add each of our thumbnails into the gallery_thumbnails div. First start by getting rid of any text that may be after the start of the div. Then go through and or your thumbnails start to finish will display left to right.
You will click on each thumbnail individually and while each are selected you will go into the properties bar of DW and select the folder next to the link box to link each to their fullsize image.Once you have your full size images linked to your thumbnails you will label them with a title="your caption for the photo" This will be used to display your descriptions later.
Example:
 Javascript and Jquery will intercept advanced techniques -- this early they are not fully embeded yet.
Thumbnail Properties with CSS
New CSS Rule -- compound -- a img -- gallery.css
Border properties -- Style; same for all = noneNew CSS Rule -- compound -- .gallery_thumbnails a -- gallery.css
Block properties -- Block; Display = block
Box properties -- w = 75 px -- h = 60 px // Float = Left // Padding; same for all = 0 // Margin; top = 0, right = 20, bottom = 20, left = 0
Border properties -- Same style = solid // width = 1 px // color = #999
New CSS Rule -- compound -- .gallery_thumbnails a:hover -- gallery.css
Border Properties -- color = white
New CSS Rule -- compound -- .gallery_thumbnails a.selected -- gallery.css
Border Properties -- color = white
>>>>Inserting javascript and plug-ins: ( Section3 )
First we need to insert our javascript at:
jquery.com -- go to the download button and save it to the includes folder (we will be working with the 1.5.2 version minature -- jquery-1.5.2.min.js)
Next we will download the pre-load plug-in at:
http://www.farinspace.com/jquery-image-preload-plugin/
Scroll down to jQuery imgpreload plugin -- This will take you to github social coding. You can download from there to your includes folder (you may want to make a new folder for farinspace.
Our last download will be for our light box the plug in is at:
fancybox.net -- jqueryfancybox-1.3.4.js we will also be attaching the jqueryfancybox-1.3.4.css
When you download this you can just drag the fancybox folder into your includes. We will be using the script for this and the css style sheet.
The fancy box folder will also include an index sheet with examples and you can open it in DW or view the source code to see how they get each affect, in case you want to change it up. link to indexWe will also be creating our own new javascript to overwrite some of the other features. You can do this by going to
File --> New --> javascript --> Create --- Then Save as --> gallery.js
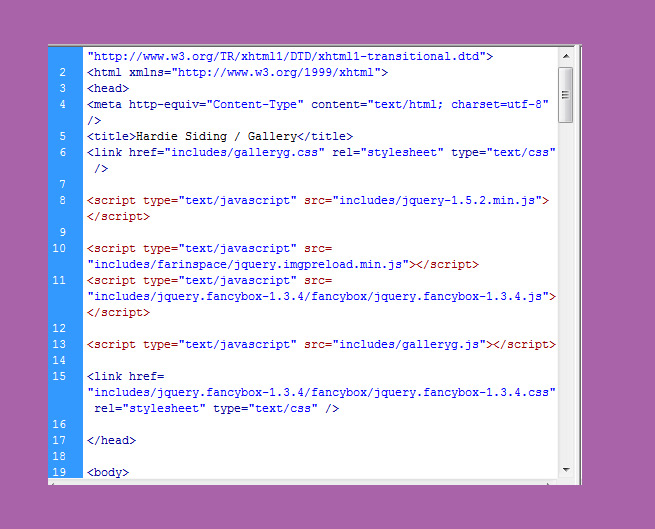
Now that we have all of our downloads we need to insert our 3 scripts and attach our css from the fancybox folder. When finished your top bar in DW should look like this:
Note: My css and javascript are saved as galleryg.css and galleryg.js -- Yours should be gallery.css and gallery.js

And your html should look like this:
Note: Be sure to have the main javascript on to the 1.5.2 and your personal javascript on bottom gallery.js or else it won't work properly. The two plug-ins can go in either order.